Join Kit Colbert in a walkthrough oveview of the VMware vCenter Operations Manager, a component of the vCenter Operations Management Suite. These are the new Features of VMware vCenter Operations Management Suite Editions.
New Operations Management Dashboard provides comprehensive views into health, risk and efficiency scores of your cloud infrastructure. Quickly drill down to see what’s causing current workload conditions, pinpoint potential problems in the future and identify areas with inefficient use of resources.
New Correlation of Performance and Change Events inside the guest operating system enable administrators to quickly understand and remediate performance issues arising from configuration changes.
New Compliance Checking of vSphere Hosts allow administrators to maintain a compliant infrastructure and automated the hardening of vSphere hosts with pre-built security and compliance guidelines.
New Smart Alerts provide pro-active notifications of building health, performance and capacity issues in the environment. Automated root cause analysis identifies the offending metric across all layers of the infrastructure.
New Capacity Planning, Reporting and Optimization views help administrators optimize VM density; identify areas of reclaimable waste and chronic capacity shortfalls. Configurable alerts notify of changing capacity conditions in production and non-production areas.
New Integrated Cost Metering and Reporting capabilities provide visibility into the financial value of consumed resources and enable administrators to optimize provisioned capacity for lowest cost without sacrificing performance.
New Discovery and Visualization of Application and Infrastructure Dependencies bring application-level awareness to infrastructure and operations teams to ensure service levels and disaster recovery protection for all critical application services. Application components and version numbers are named automatically and updated continuously.
Tuesday, January 24. 2012
VMware vCenter Operations 5.0 - Introduction Video
Monday, January 23. 2012
What happens to resource pools when vCenter goes down?
A fellow VCI who was teaching the vSphere 5 What's New training course got a question from a student asking what happens to resource pools when vCenter goes down, because with vSphere 5.0 all the setting for resource pools are "moved" to vCenter.
Andy Cary who works as a Senior Technical Trainer at VMware responded immediately with: I created a RP on my vCenter and turned off expandable reservations for memory. Placed VM1 under said resource pool and failed to power up because the VM need to reserve memory for the overhead of running the VM (had no reservations set on the RP). So next I directly connected to the host and powered on the VM with no problem at all. However when you go back to the vCenter it displays:
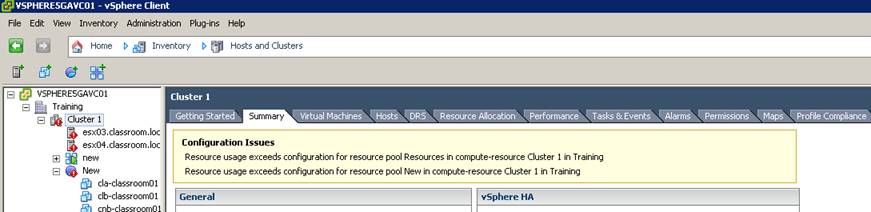
The Cluster with the RP is now invalid because it can see the VM has powered on. So the configuration about DRS RP is saved on the vCenter but it doesn’t stop you going directly to the host an powering on the VM. Now in vSphere 5.0 if you directly connect to a host and try and create a local resource pool it will throw up an error saying this isn’t allowed because it can see you are managed by vCenter, this is the case even if the Host isn’t a member of DRS cluster. So the creation and management of RP is done via vCenter, if vCenter goes down the rules cannot be applied so you could get admin powering on VMs by directly connecting to the hosts. So in summary all we have done is said “You can only create, modify resource pools via vCenter and not by directly connecting to the host”
Andy Cary who works as a Senior Technical Trainer at VMware responded immediately with: I created a RP on my vCenter and turned off expandable reservations for memory. Placed VM1 under said resource pool and failed to power up because the VM need to reserve memory for the overhead of running the VM (had no reservations set on the RP). So next I directly connected to the host and powered on the VM with no problem at all. However when you go back to the vCenter it displays:
The Cluster with the RP is now invalid because it can see the VM has powered on. So the configuration about DRS RP is saved on the vCenter but it doesn’t stop you going directly to the host an powering on the VM. Now in vSphere 5.0 if you directly connect to a host and try and create a local resource pool it will throw up an error saying this isn’t allowed because it can see you are managed by vCenter, this is the case even if the Host isn’t a member of DRS cluster. So the creation and management of RP is done via vCenter, if vCenter goes down the rules cannot be applied so you could get admin powering on VMs by directly connecting to the hosts. So in summary all we have done is said “You can only create, modify resource pools via vCenter and not by directly connecting to the host”
Sunday, January 22. 2012
Video - vCloud Director 1.5 - Quick Start
Saturday, January 21. 2012
White Paper - Mobility and Disaster Recovery Solution for Virtualized Tier-1 Enterprise Applications
 To meet ever growing IT infrastructure needs and to ensure business continuity in case of a site-level disaster, it is critical to have live mobility and fully automated, efficient disaster recovery (DR) processes for virtualized enterprise applications across data centers. Failure to have a robust and efficient mobility and fully automated disaster recovery solution can result in millions of dollars of lost revenue and employee productivity.
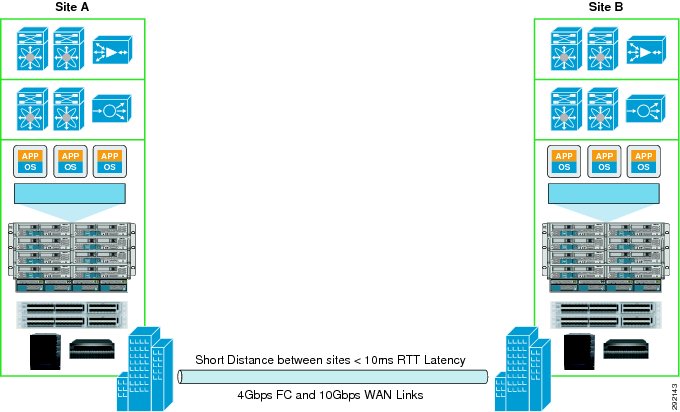
This white paper showcases a flexible solution from Cisco®, VMware®, and EMC® that allows customers to efficiently achieve live mobility and fully automated DR for virtualized enterprise applications across data centers with less than 10ms round-trip time (RTT) latency between them.
Live mobility for virtualized applications across data centers enables IT organizations to efficiently meet various operational needs, e.g., data capacity expansion, seamless migrations, disaster avoidance, etc.
Fully automated DR allows customers to protect their mission critical enterprise applications against site-level disasters and ensures business continuance. A key advantage of this solution over manual, runbook style DR process execution is "minimum downtime with lowest Recovery Time Objective (RTO)". This is extremely critical for next generation cloud solutions required to host hundreds to thousands of virtualized applications on the same shared infrastructure.
The Cisco, VMware, and EMC design presented in this white paper is very modular so that, based on customer requirements, there is flexibility to deploy both the live mobility and fully automated DR solution or deploy any one of these solutions.
http://www.cisco.com/en/US/docs/solutions/Enterprise/Data_Center/DCI/4.0/EMC/mobdisasterrecapps.html
http://www.cisco.com/en/US/docs/solutions/Enterprise/Data_Center/DCI/4.0/EMC/mobdisasterrecapps.html
Friday, January 20. 2012
Video - Install vSphere Syslog Collector and configure ESXi logging
 (Page 2 of 5, totaling 22 entries)

