This technical document provides best practices and configuration guidance for implementing VMware Virtual Volumes (vVols) in a Metro/Stretched Storage Cluster environment using vSphere 8. It explores how to properly configure vSphere High Availability (HA), Distributed Resource Scheduler (DRS), and storage components across two data centers to ensure workload availability and balanced resource usage. The paper also details various failure scenarios and their handling, emphasizing the importance of proper site affinity configuration and VASA Provider availability for optimal cluster performance.
Quicksearch
Your search for esx server configuration www XsigoServerFabricPerformanceTestResults returned 1215 results:
Tuesday, December 24. 2024
Metro/Stretched Storage Clustering Best Practices with Virtual Volumes (vVols) on VMware vSphere 8
Thursday, December 12. 2024
Protecting and Recovering Mission-Critical Applications in a VMware Hybrid Cloud with VMware Live Site Recovery
Monday, November 18. 2024
VMware Cloud Foundation Automation ABX Actions for Ansible Automation Platform - User Guide
Tuesday, September 17. 2024
Performance Best Practices for VMware vSphere 8.0 Update 3
Sunday, June 9. 2024
Ensuring High Availability and Disaster Recovery in NSX-T Management Cluster
Introduction
Maintaining the availability of the NSX-T management cluster is crucial for ensuring the stability and performance of your virtualized network environment. This blog post will explore strategies to ensure high availability (HA) of NSX-T managers, outline the recovery process during failures, and discuss best practices for disaster recovery.
NSX-T Management Cluster Overview
The NSX-T management cluster typically consists of three nodes. This configuration ensures redundancy and fault tolerance. If one node fails, the cluster retains quorum, and normal operations continue. However, the failure of two nodes can disrupt management operations, requiring swift recovery actions.
High Availability in NSX-T Management Cluster
- Quorum Maintenance:
- The management cluster needs at least two out of three nodes operational to maintain quorum. This ensures that the NSX Manager UI and related services remain available.
- If a node fails, the remaining two nodes can still communicate and manage the environment, preventing downtime.
- Node Failures and Impact:
- Single Node Failure: The cluster continues to function normally with two nodes.
- Two Nodes Failure: The cluster loses quorum, and the NSX Manager UI becomes unavailable. Management operations via CLI and API will also fail.
Recovery Strategies
When a majority of the nodes fail, swift action is required to restore the cluster to a functional state.
- Deploying a New Manager Node:
- Deploy a new manager node as a fourth member of the existing cluster.
- Use the CLI command detach node <node-uuid> or the API endpoint /api/v1/cluster/<node-uuid>?action=remove_node to remove the failed node from the cluster.
- This command should be executed from one of the healthy nodes.
- Deactivating the Cluster (Optional):
- Run the deactivate cluster command on the active node to form a single-node cluster.
- Add new nodes to restore the cluster to its three-node configuration.
Best Practices for Disaster Recovery
- Regular Backups:
- Schedule regular backups of the NSX Manager configurations to facilitate quick recovery.
- Store backups securely and ensure they are easily accessible during a disaster recovery scenario.
- Geographical Redundancy:
- Deploy NSX Managers across multiple sites to ensure geographical redundancy.
- In case of a site failure, the other site can take over management operations with minimal disruption.
- Proactive Monitoring:
- Use NSX-T's built-in monitoring tools and integrate with third-party solutions to continuously monitor the health of the management cluster.
- Early detection of issues can prevent major failures and reduce downtime.
- Disaster Recovery Sites:
- Prepare a disaster recovery site with standby NSX Managers configured to recover from backups.
- This setup allows for quick restoration and ensures continuity of operations in case of a primary site failure.
Conclusion
Ensuring the high availability and disaster recovery of your NSX-T management cluster is essential for maintaining a robust and resilient virtual network environment. By following best practices for node management, deploying a geographically redundant setup, and maintaining regular backups, you can minimize downtime and ensure swift recovery from failures.
For a deeper dive into the technical details, check out these resources:
- VMware NSX-T Data Center Documentation
- Backup and Restore of VMware Cloud Foundation
- NSX Manager cluster is DOWN or UNAVAILABLE if all nodes part of the the NSX Manager cluster is down or majority nodes are down
In this video, I'll demonstrate these concepts in action, explore various failure scenarios, and discuss disaster recovery strategies in detail. You can obtain a copy of the original Excalidraw whiteboard file along with the presentation slides in both PDF and PowerPoint formats from GitHub.
Friday, April 12. 2024
CoolTool: VirtualC64
Monday, January 15. 2024
Streamlining vSphere Operations with ChatGPT
In this article, we'll explore how ChatGPT can automate the generation of a Python script for managing the power states of virtual machines within VMware vCenter. To initiate, you need to prompt ChatGPT to generate a script by posing the question:
Could you develop a Python script for VMware vCenter to retrieve the virtual machines and allow the user to control their power states? The server details are: host name 'vc.ntpro.local', username 'administrator@ntpro.local', password 'VMware1!' Please ignore certificate errors and use tls.
ChatGPT's response will be affirmative, recommending the use of the pyvmomi library to interface with VMware vCenter. It will advise on installing the pyvmomi library via pip, if not already done so.
You can find the complete Python code through this link.
For Python project management, I prefer the PyCharm Community Edition. The pyvmomi module is crucial for our tasks and can be conveniently installed via the terminal with 'pip install pyvmomi'. PyCharm also offers a GUI for handling Python packages.
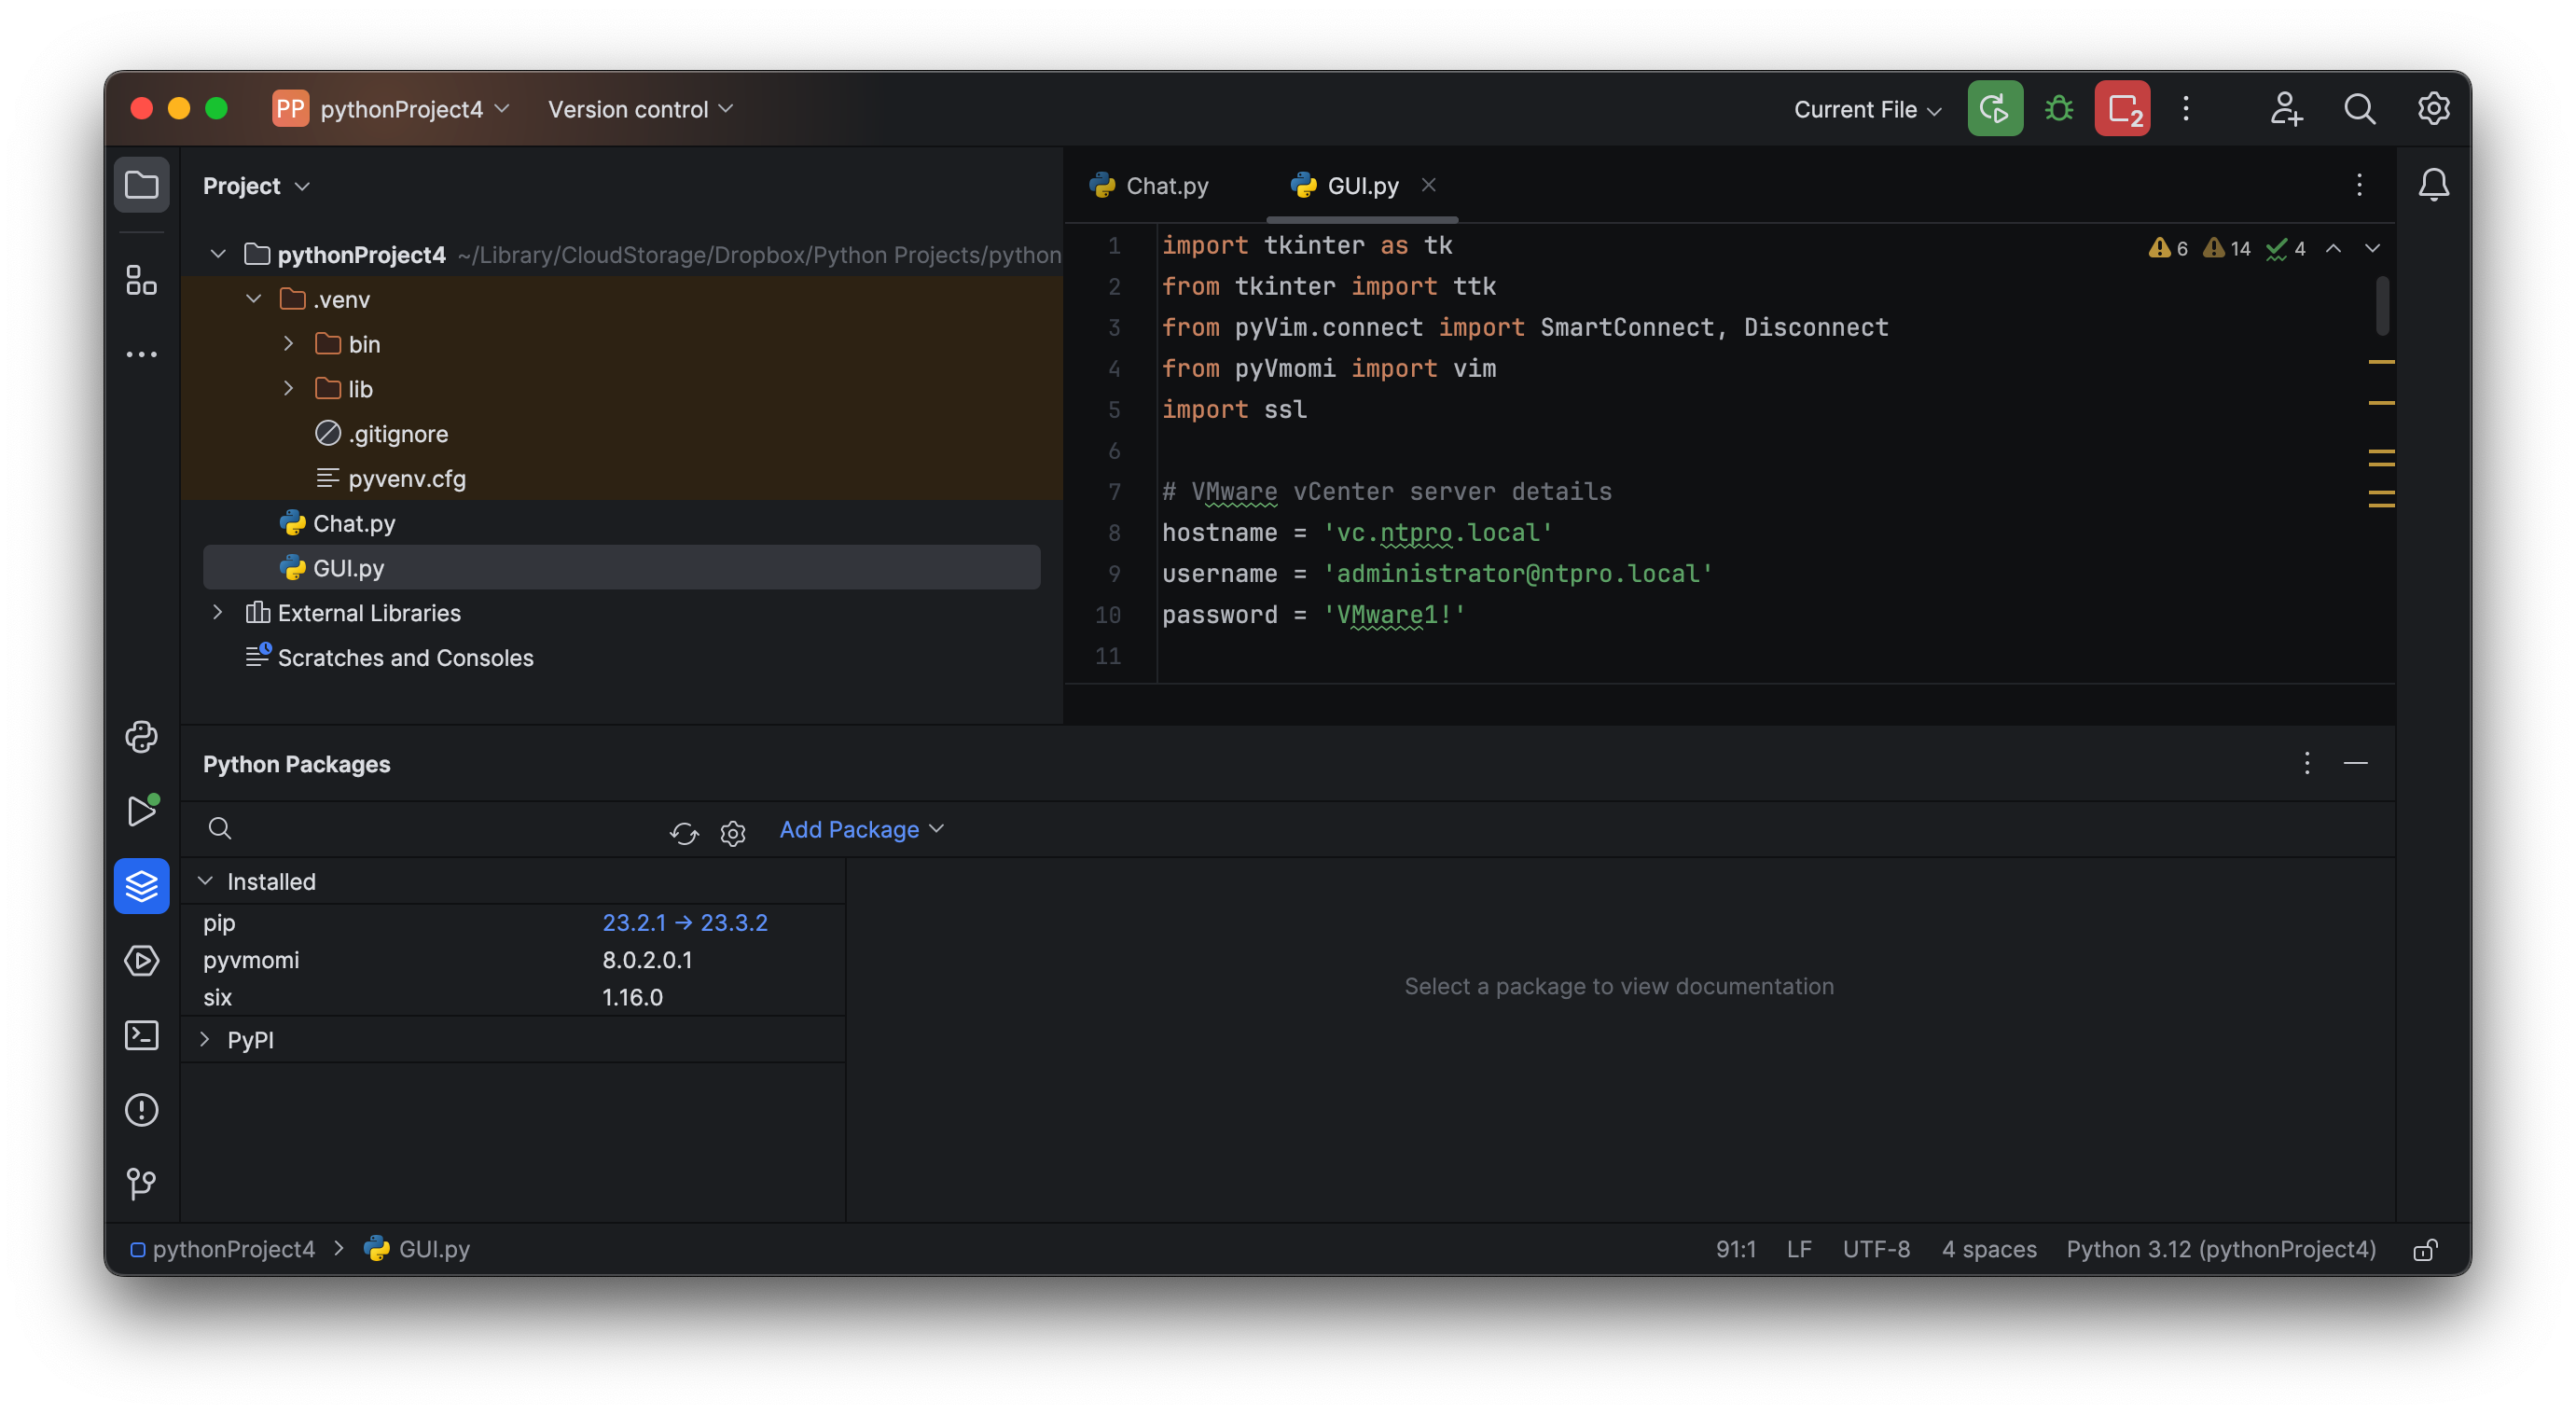 After generating a new Python file, insert the ChatGPT-provided script into PyCharm's editor. Execution may require some adjustments, like updating TLS versions. Should errors arise, ChatGPT is equipped to troubleshoot and provide solutions. Once the refined script is implemented, it successfully retrieves and manages the power states of the virtual machines from vCenter.
In a subsequent step, I prompted ChatGPT to integrate a basic GUI into the script using the pre-installed TKInter module from Python3. The resulting interface displays a virtual machine list with functional power controls. Despite a minor glitch with the "wait task" during the demonstration, the core functionality was unaffected.
 Remember, repeated queries won't yield identical results when soliciting code from ChatGPT. Precision in your inquiries enhances ChatGPT's ability to generate effective code. If your code encounters issues, ChatGPT can help debug and even elucidate the script's workings in depth. Enjoy coding!
Continue reading "Streamlining vSphere Operations with ChatGPT" »
Friday, January 12. 2024
Setting Up ESXi ARM on the Raspberry Pi 5
In this article, we explore the innovative implementation of VMware's ESXi ARM on the Raspberry Pi 5. The focus is on setting up ESXi ARM on the Raspberry Pi 5, which was initially challenged by a lack of UEFI support. This obstacle is surmounted by Mario Bălănică's development of a Raspberry Pi 5-specific UEFI bios. The setup process is detailed, emphasizing the necessity of an external USB network adapter, and the steps from microSD card preparation to management network configuration.
In 2018, Pat Gelsinger, then CEO of VMware, made a groundbreaking announcement at the VMworld keynote presentation in Las Vegas, revealing the ability to operate ESXi on a Raspberry Pi. Following the presentation, I connected with Alexander Fainkichen, a pivotal contributor to the initiative, for a sit-down interview. As a presenter for VMworld TV at a time when edge computing was surging in popularity, I had the opportunity to delve into the subject. The full interview remains accessible on VMware’s Explore channel.

‘Back at Vegas, people asked us in jest whether the Pi could ever run ESX. We decided it was worth showing that it is possible. ESX on Pi is a promise that VMware understands that the Edge includes extremely low end devices as well. Scaling with the workload and envo is important!’
I recently acquired the cutting-edge Raspberry Pi 5, aiming to set up ESXi ARM. It was tailored for the Raspberry Pi 4, but initial attempts to operate it on the Raspberry Pi 5 were met with a challenge due to the absence of UEFI support.
 However, this scenario changed about a week back when Mario Bălănică, associated with the Windows on Raspberry (WoR) project, unveiled a UEFI bios specially designed for the Raspberry Pi 5. This critical development has enabled the device to install ESXi ARM.
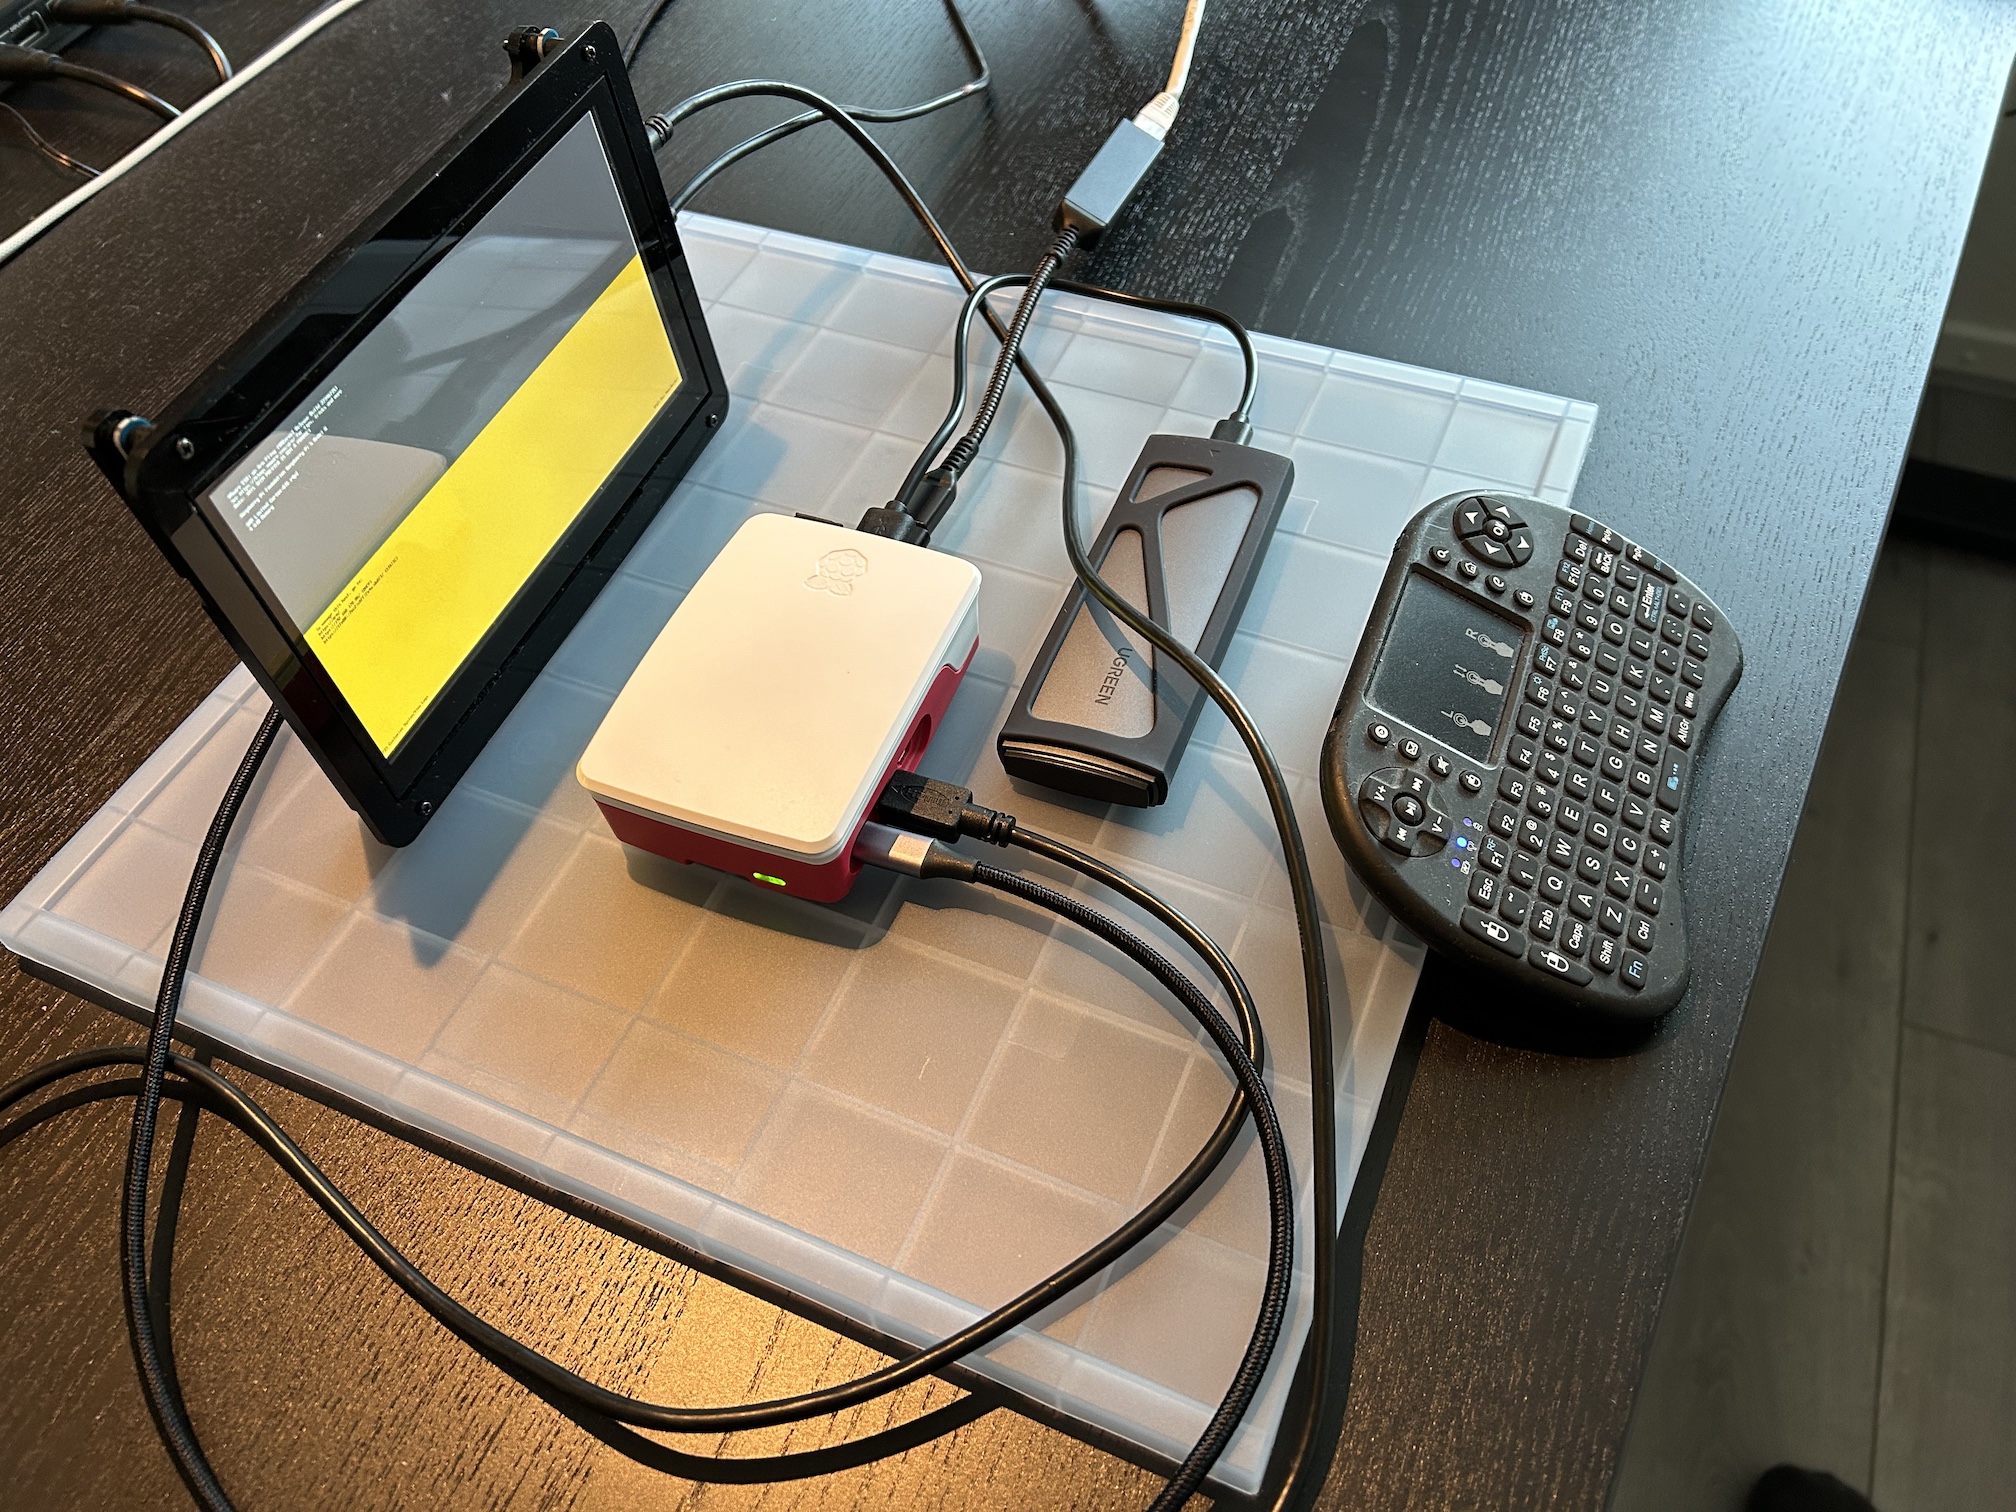
Before proceeding, it's important to note a few prerequisites. The Raspberry Pi 5's built-in network adapter is marked an unsupported UEFI peripheral, necessitating the use of an external USB network adapter. For my setup, I chose the Maxonar USB C Ethernet Adapter, which offers reliable Gigabit LAN connectivity.
The installation procedure is quite direct. Begin by copying the UEFI files onto a microSD card formatted to FAT32. Next, transfer the ISO contents of the ESXi ARM installer onto a FAT32-compliant USB drive. Once you power up the Raspberry Pi, the installation should initiate on its own.
During my initial setup, the installation paused at 81%, hindered by the lack of a network adapter for the management network. This hiccup is overcome on the first reboot, where the USB network adapter is recognized, allowing the configuration of the management network thereafter.
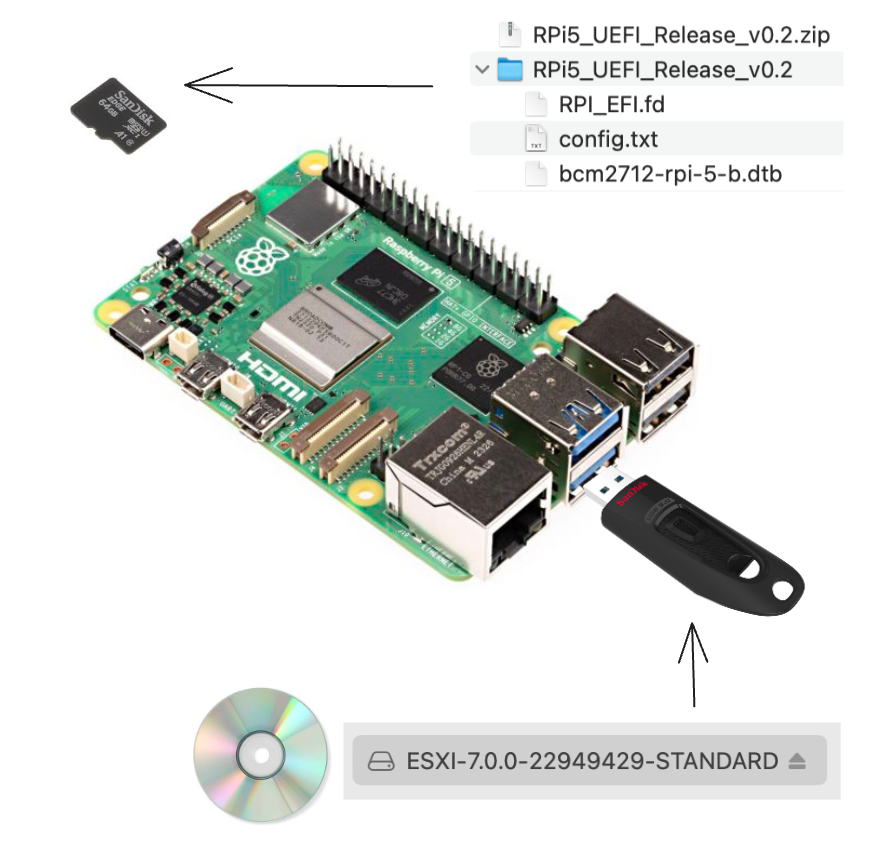
The storage setup utilizes a USB interface, connecting through a robust "UGREEN M.2 Adapter NVMe SSD Hard Drive Enclosure" which houses a swift "Samsung SSD 256GB PM991 M.2 2242 42mm PCIe 3.0 x4 NVMe" drive. This USB drive plays a triple role: it's the install-boot media, the destination for the ESXi install, and the local storage for VMFS (Virtual Machine File System). You can leave it inserted after the installation completes. In future enhancements, I plan to integrate the Samsung SSD into my setup more seamlessly, using the PineBerry m.2 HATDrive, interfaced via NVMe.
In this video, I've captured the entire installation process from beginning to end, and it takes just 5 minutes to complete. The recording was done using a Video Capture Card, a Guermok USB 3.0 HDMI to USB C Audio Capture Card, and QuickTime on a Mac.
Once the installation is finalized, the next step is to start running virtual workloads. My first action was to set up a Photon virtual machine; VMware conveniently provides an ARM-compatible OVA file. The process is hassle-free, since I'm using Virtual Center to manage the ARM-based ESXi host—just a few clicks and the virtual machine springs to life.
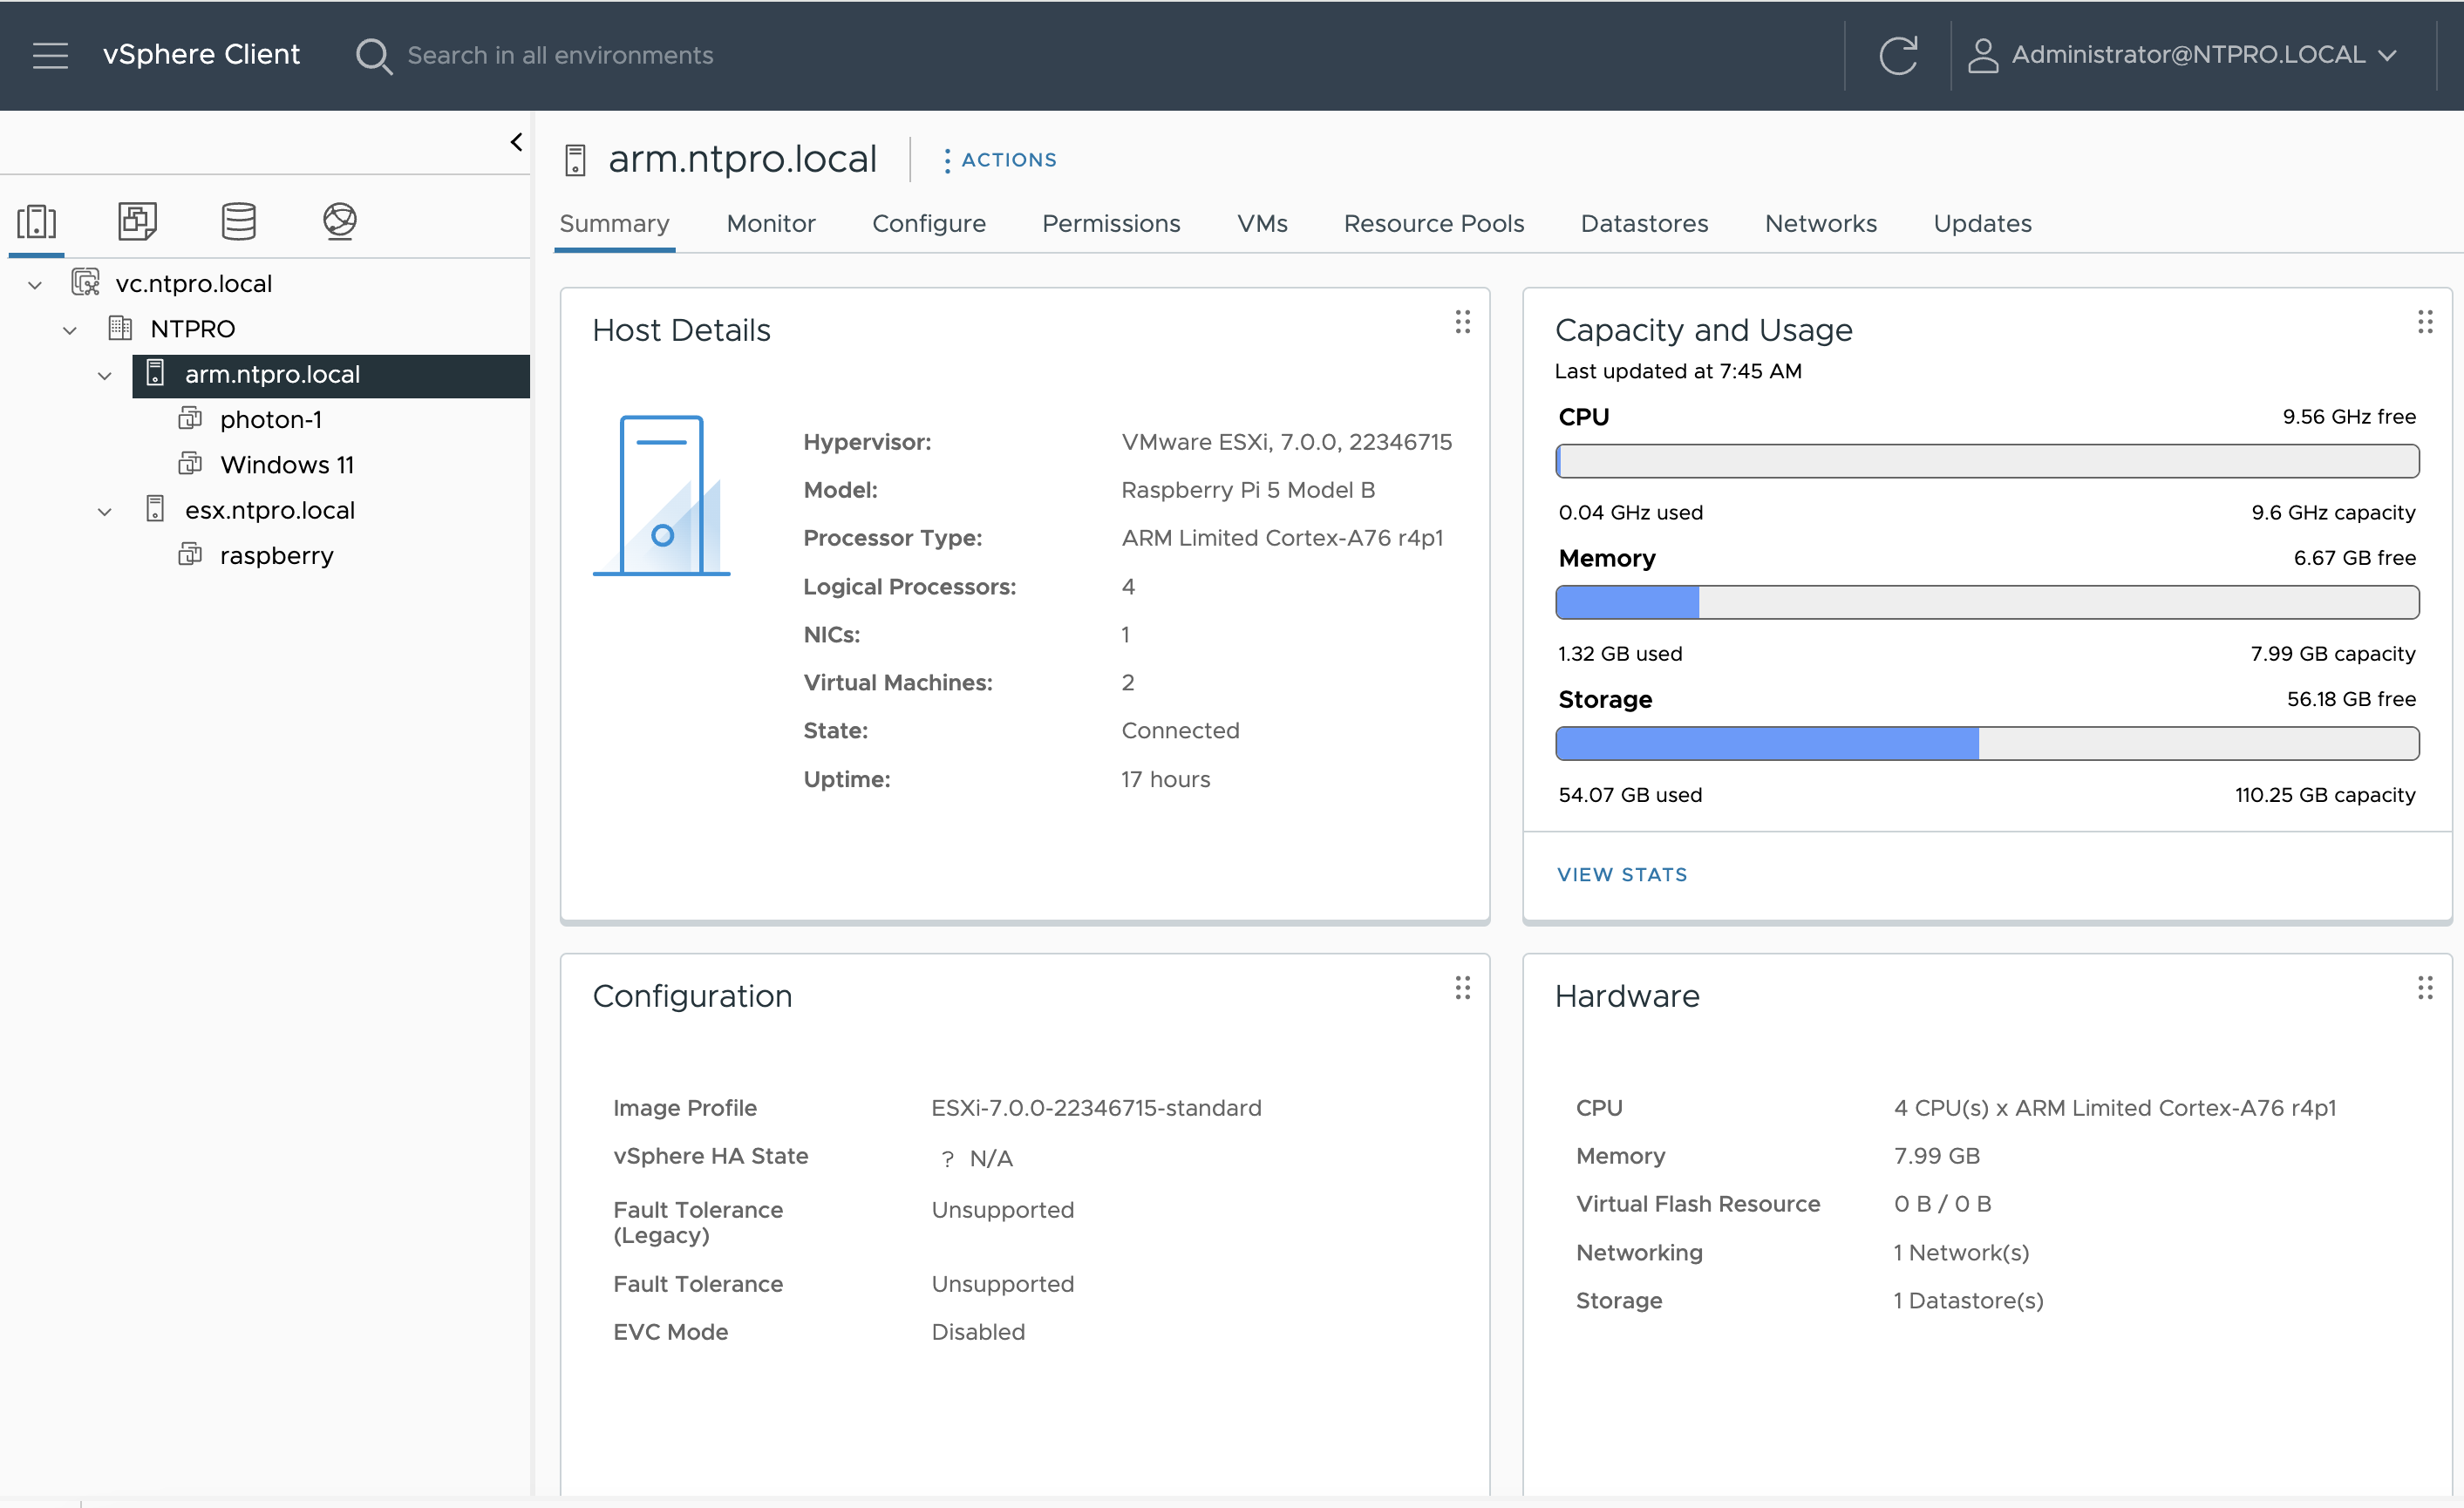
The subsequent hurdle was setting up a Windows environment. Locating an ARM-compatible Windows ISO proved challenging, but after a diligent search, I found one. I uploaded the ISO to the local data store and configured a Windows VM. The installation of Windows was time-consuming, and the initial startup was even more prolonged. Eventually, a blue screen error interrupted the process, which requires further investigation.
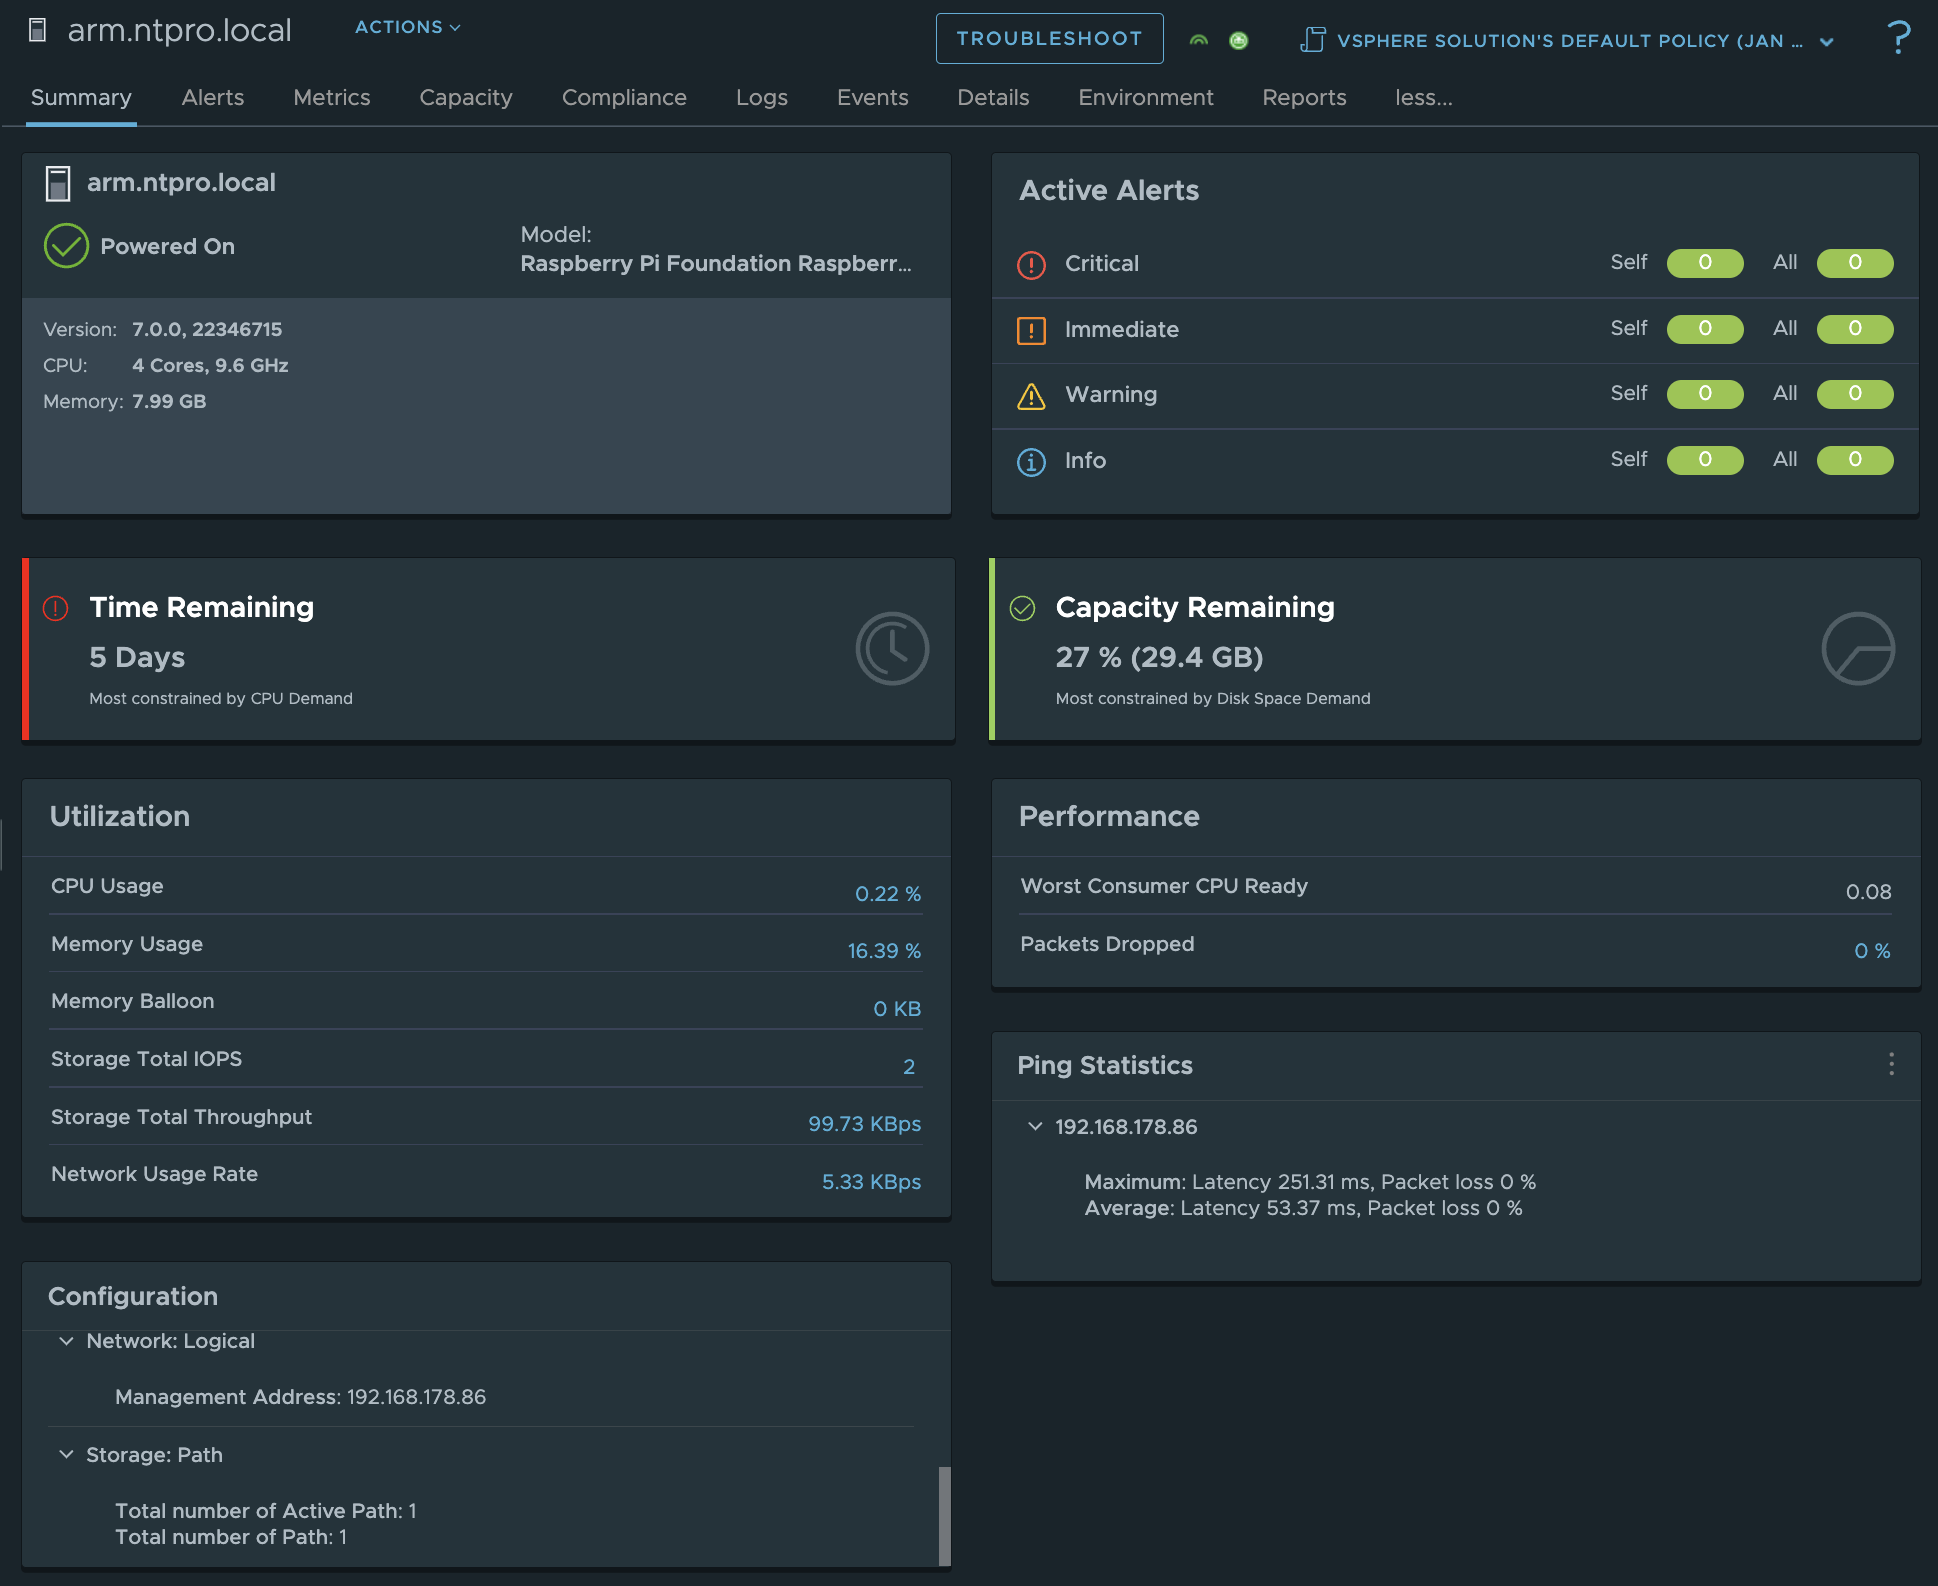
Initially, I operated on a Raspberry Pi 5 with 4 GB of RAM, but soon transitioned to a more robust 8 GB model to accommodate additional VM workloads. Monitoring of the vCenter server is conducted through Aria Operations, which allows me to keep an eye on the ESXi ARM host and virtual machines via comprehensive dashboards. I've also set up Aria Operations for log management, simplifying the troubleshooting process.
In summary, the article showcases the advancements and challenges in setting up and running ESXi ARM on the Raspberry Pi 5. It highlights the technical requirements, the setup process, and the potential for hosting various virtual workloads, along with the importance of continuous monitoring and system optimization. Special thanks to Jimmy van der Mast for providing technical expertise.
Continue reading "Setting Up ESXi ARM on the Raspberry Pi 5" »Tuesday, January 9. 2024
Mastering vCenter Operations with Python: A Script to Manage Your VMs
Saturday, December 23. 2023
TensorFlow Management Pack For VMware Aria Operations
I've successfully connected a Raspberry Pi 5 running TensorFlow to VMware Aria Operations, and I'm excited to share the simplicity of the process. The new Management Pack Builder from VMware transforms the creation of custom management packs into a straightforward task. This intuitive tool, which requires no coding skills, invites us to extend the capabilities of our monitoring systems with ease. Join me as we explore how this setup can revolutionize your operational management, making it more efficient and responsive to your needs.
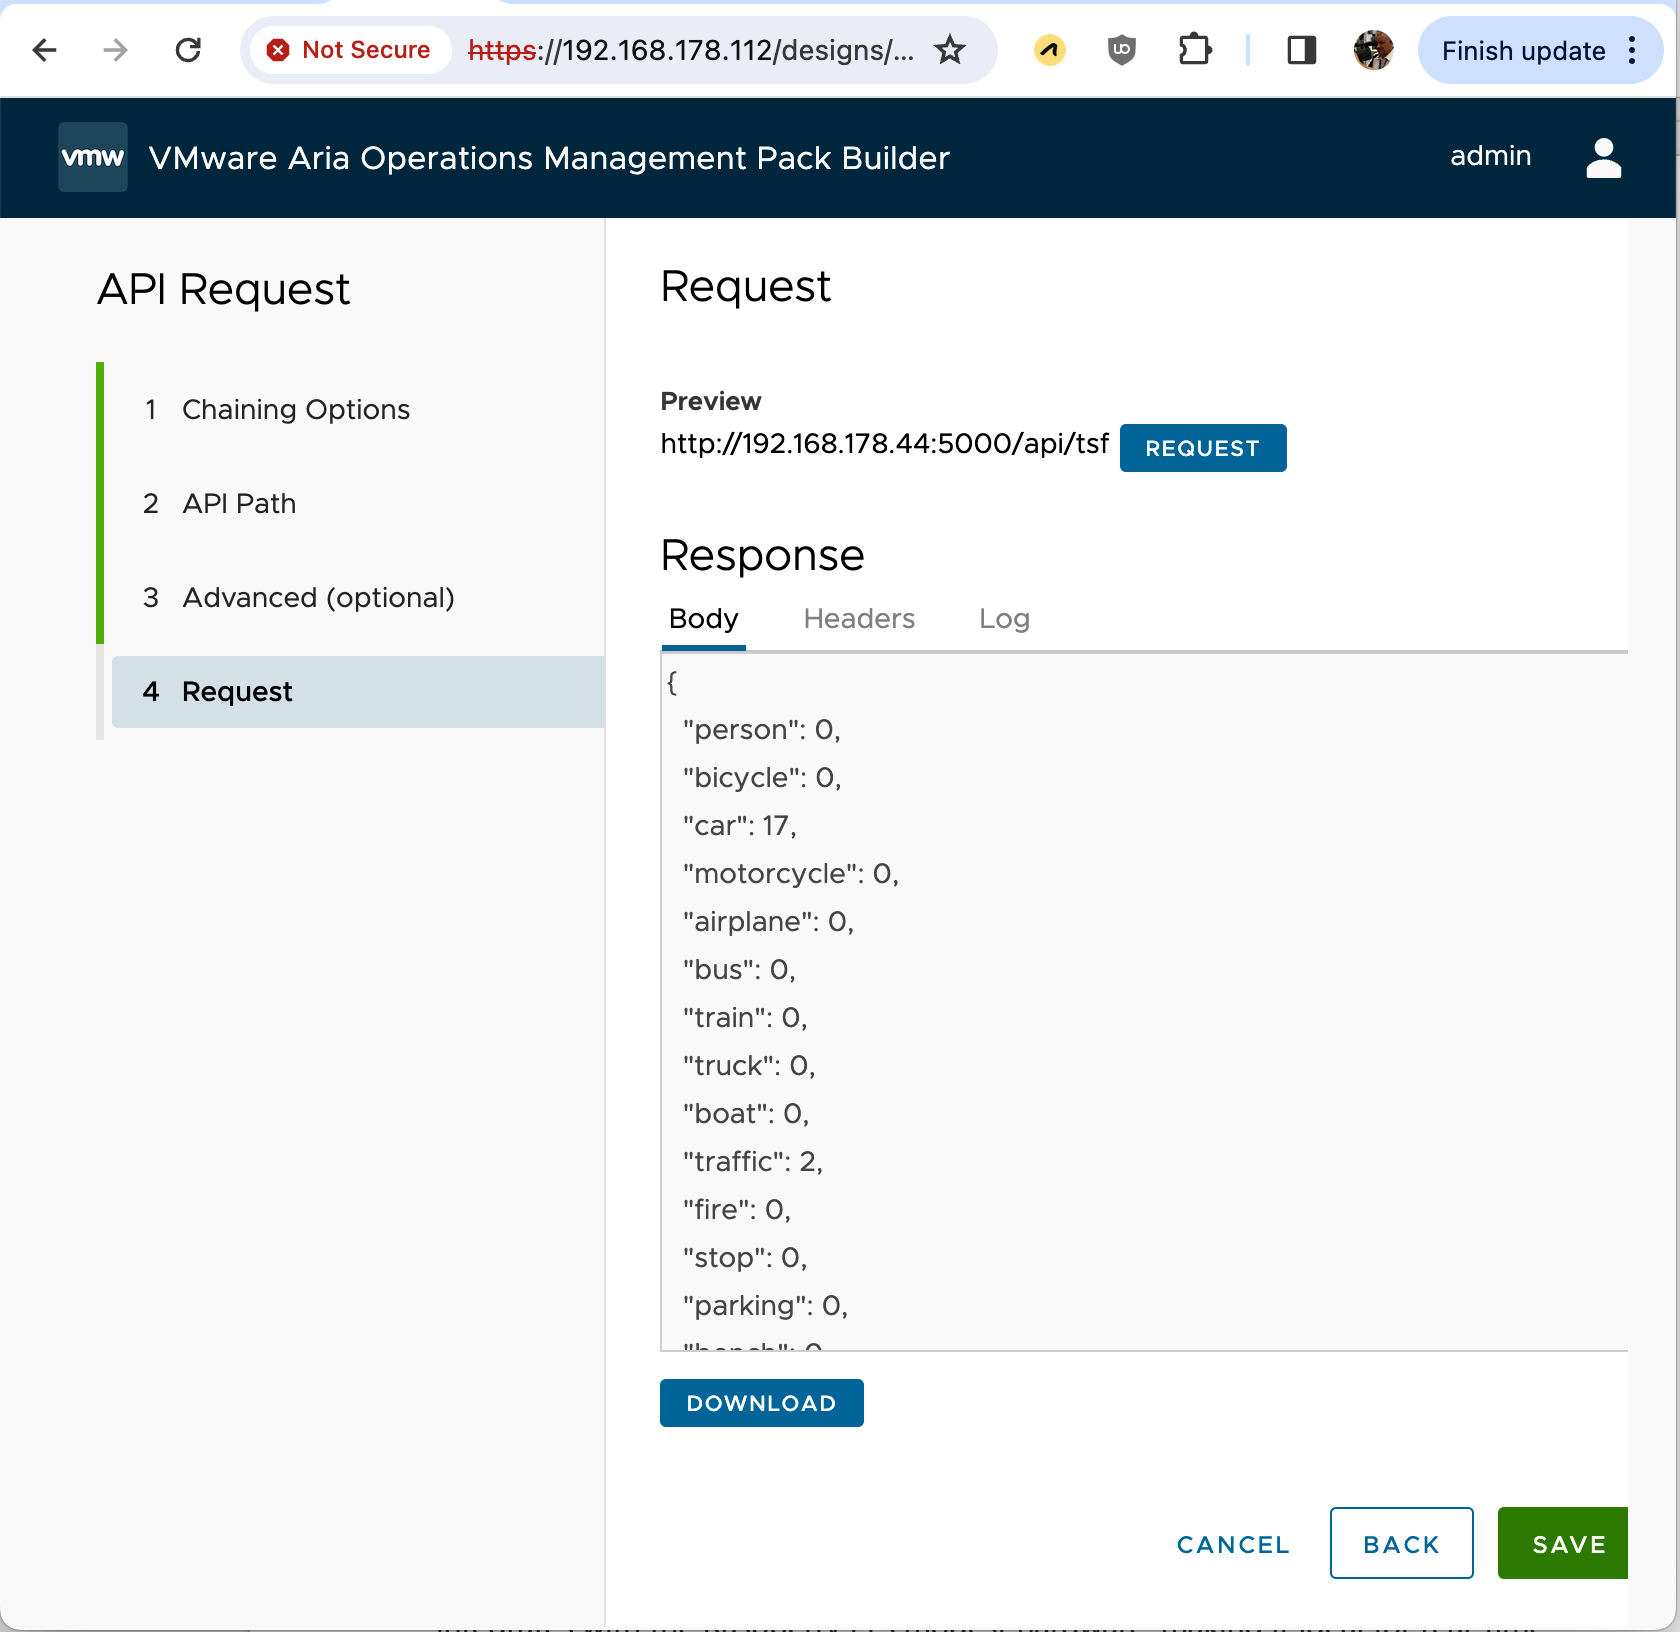
The VMware Aria Operations Management Pack Builder is a self-contained tool designed to facilitate the development of bespoke management packs for VMware Aria Operations. It offers a user-friendly, code-free approach to importing data from external APIs. This tool allows the creation of new resources or the enhancement of existing VMware and third-party resources by adding new data, establishing relationships, and integrating events.

TensorFlow, renowned for its versatility in machine learning, is particularly effective for object detection projects on Raspberry Pi. This lightweight platform seamlessly integrates with the modest hardware of the Raspberry Pi, making it ideal for real-time object detection tasks. By utilizing a camera module with TensorFlow, users can develop efficient, on-device models capable of identifying and categorizing objects in the camera's field of view.
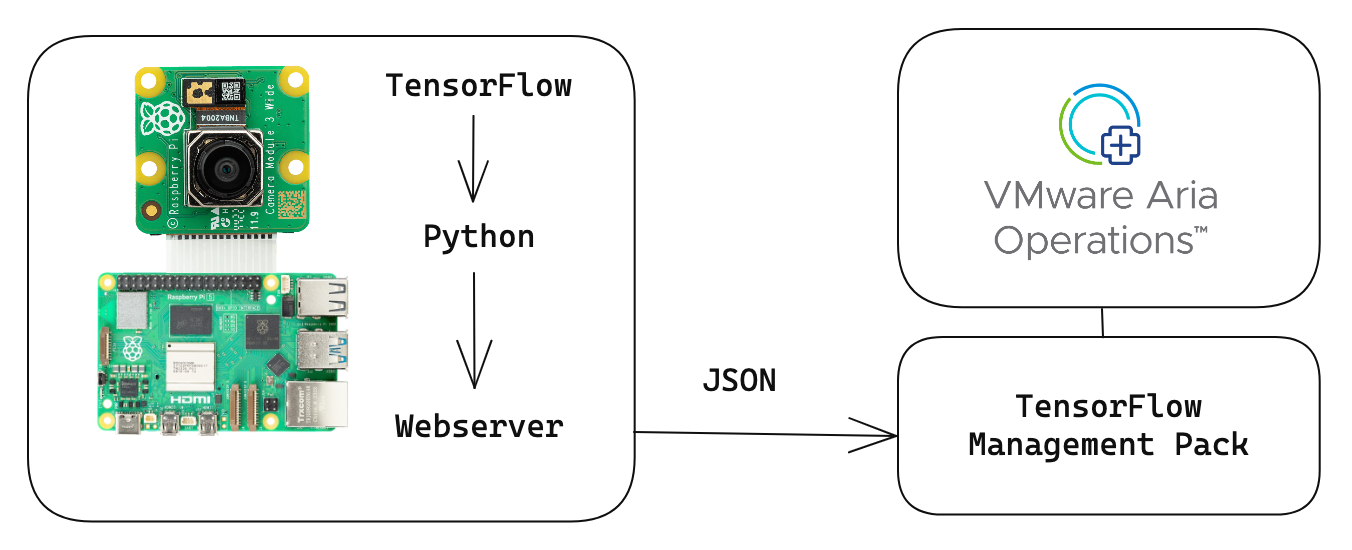
The Raspberry Pi 5 uses a Python script tailored for object detection, processing images from its camera into structured JSON data. Additionally, it operates a web server that presents a REST API to Aria Operations, enabling the collection and statistical analysis of object detection data processed by TensorFlow.
{"person": 1, "bicycle": 0, "car": 17, "motorcycle": 0, "airplane": 0, "bus": 0, "train": 0, "truck": 1, "boat": 0, "traffic": 0, "fire": 0, "stop": 0, "parking": 0, "bench": 0, "bird": 0, "cat": 0, "dog": 0, "horse": 0, "sheep": 0, "cow": 0, "elephant": 0, "bear": 0, "zebra": 0, "giraffe": 0, "backpack": 0, "umbrella": 0, "handbag": 0, "tie": 0, "suitcase": 0, "frisbee": 0, "skis": 0, "snowboard": 0, "sports": 0, "kite": 0, "baseball": 0, "skateboard": 0, "surfboard": 0, "tennis": 0, "bottle": 0, "wine": 0, "cup": 0, "fork": 0, "knife": 0, "spoon": 0, "bowl": 0, "banana": 0, "apple": 0, "sandwich": 0, "orange": 0, "broccoli": 0, "carrot": 0, "hot": 0, "pizza": 0, "donut": 0, "cake": 0, "chair": 0, "couch": 0, "potted": 0, "bed": 0, "dining": 0, "toilet": 0, "tv": 0, "laptop": 0, "mouse": 0, "remote": 0, "keyboard": 0, "cell": 0, "microwave": 0, "oven": 0, "toaster": 0, "sink": 0, "refrigerator": 0, "book": 0, "clock": 0, "vase": 0, "scissors": 0, "teddy": 0, "hair": 0, "toothbrush": 0}
The package file and the corresponding Python code can be accessed and downloaded from my GitHub repository. You can find guidance on setting up TensorFlow on a Raspberry Pi in a previous article I have authored.
Continue reading "TensorFlow Management Pack For VMware Aria..." » (Page 2 of 122, totaling 1215 entries)