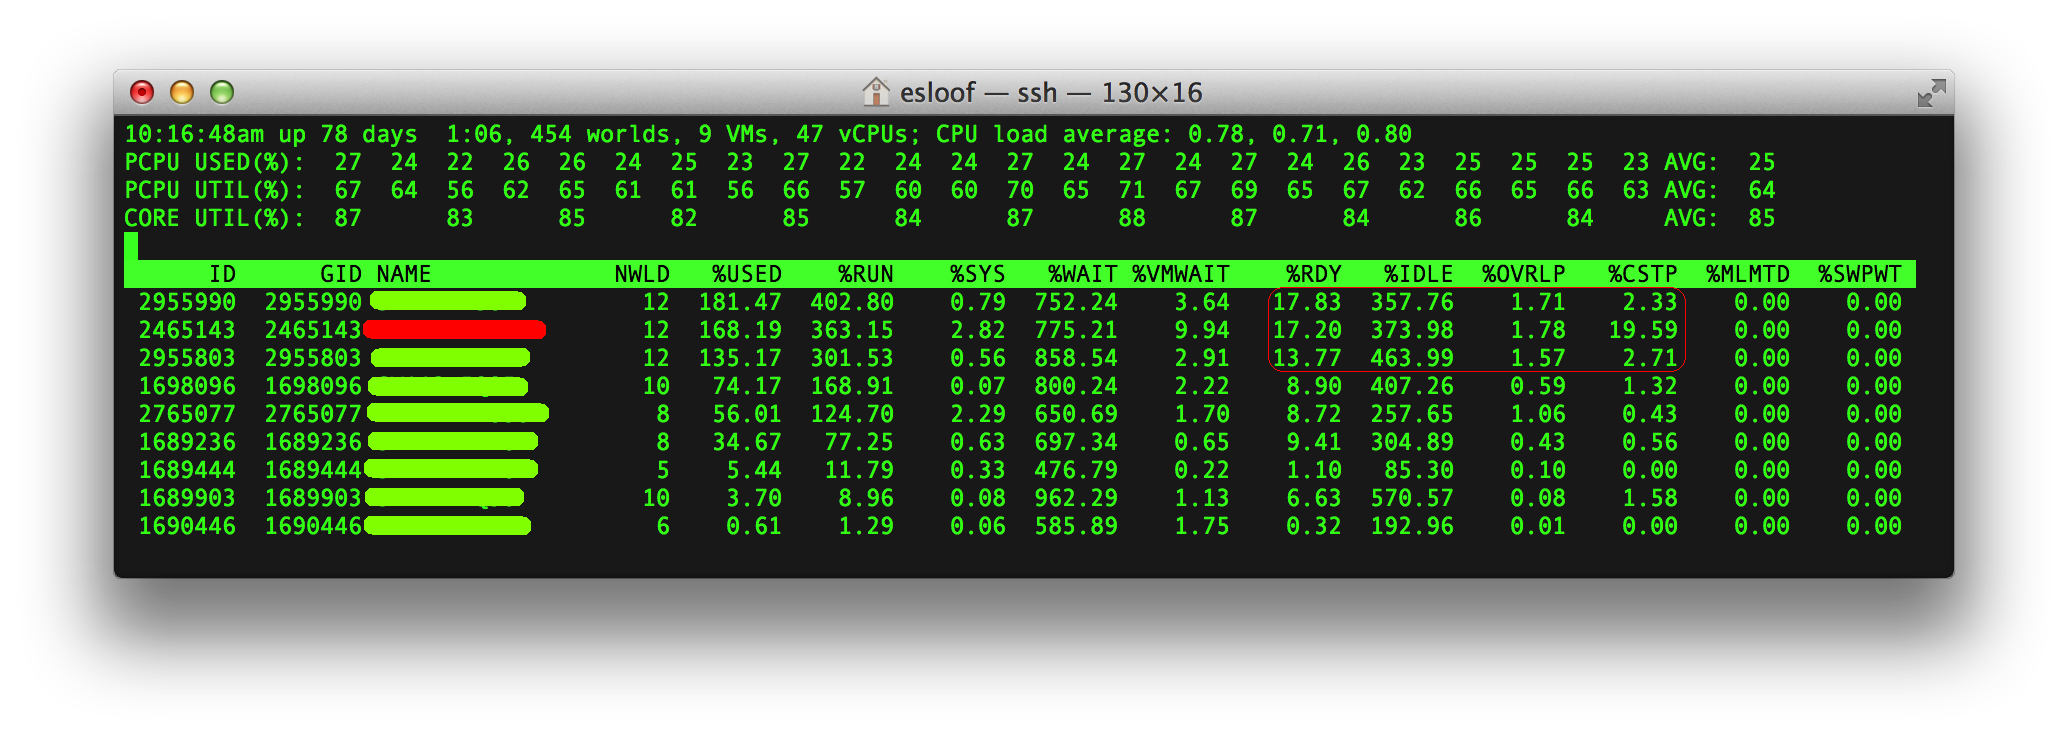
IBM System Networking Distributed Virtual Switch 5000V provides managed, advanced networking functionality for virtual machines in VMware vSphere 5.0 environment
IBM System Networking Distributed Virtual Switch 5000V is a highly manageable, distributed virtual switch for VMware vSphere 5.0 Enterprise Plus environment. IBM DVS 5000V provides advanced networking features and troubleshooting features, which make it ideal for deployments in large-scale Server Virtualization and Cloud environments. The IBM DVS 5000V appears as a standard network switch, which enables network administrators to configure and manage the distributed virtual switch as a regular physical switch using familiar IBM switch user interfaces.
Take advantage of the manageability, network troubleshooting, and advanced networking features of the IBM® System Networking Distributed Virtual Switch 5000V.
• Manageability - Telnet, SSH, SNMP, TACACS+, RADIUS, Industry Standard CLI
• Network troubleshooting - SPAN, ERSPAN, sFlow, Syslog, VM network statistic • Advanced networking features - L2-L4 ACLs, Static and Dynamic port aggregation, PVLAN, QoS, EVB (IEEE 802.1Qbg)
ESXCLI commands are a comprehensive set of commands for managing most aspects of vSphere. In vSphere 5.0, this command set has been unified. Eventually, ESXCLI commands will replace other commands in the vCLI set.
esxcli command
esxcli fcoe
esxcli hardware
esxcli iscsi
esxcli license
esxcli network
esxcli software
esxcli storage
esxcli system
esxcli vm
For a consistent look and feel for both local and remote CLI administration, the new “esxcli” command provides the ability to format the command output. Using the “--formatter” option, administrators can choose to have the command output formatted as XML, a key-value pair or a list of comma-separated values. The “esxcli” formatter enhances your ability to parse command output, helping to simplify scripting and improve report generation. In addition, you can specify which fields to include in the output. In the following example, we need to generate a report showing all the storage volume names with their free space. We start by running the storage filesystem list command, as follows: esxcli --formatter=csv storage filesystem list
The output gives us the information we need, but it is very verbose, requiring the user to use the scroll bar to see the data for all the volumes. Because we need only a summary showing the volume name and free space, we can refine our command using the --formatter and --format-param options, as follows: esxcli --formatter=csv --format-param=fields="Free,VolumeName" storage filesystem list
More information about the ESXCLI command can be found at this link.
vSphere Replication is a replication engine that is part of SRM 5.0 and requires ESXi 5.0 and later, giving an alternative means of protecting and replicating virtual machines between sites. It is entirely managed within the SRM interface after initial deployment and configuration, and integrates with storage array–based replication to provide full coverage of the virtual environment.
The assumption is that there are multiple databases for vSphere Replication already configured for use, one at each site. In this evaluation guide, we will be using Microsoft SQL Server 2008 Express as a database, and using native SQL authentication for access. Workflow covered will be as follows:
When creating a database only use capitols even the username and the password need to be in capitols Also use the fully qualified domain name as a database server, don't use IP-addresses. For configuring vCenter information, scroll down and notice the vCenter configuration information that is necessary. It is very important that the vCenter Server Address field is correctly populated. If you have used IP addresses for all site pairing activities, continue to use IP addresses in this location. If your SRM sites were paired with host names or fully qualified domain names, it is important that you do the same at this location as you did when pairing the sites. VRMS requires naming consistency throughout the process in order to function correctly. Enter the vCenter Server Address for the site you are currently using, which should be the protected site (Site A) vCenter. Click on Generate and Install an SSL Certificate after all the information is filled out.
When all the information is correctly filled in and the SSL Certificate is generated, click on the Save and Restart Service button. This will register the VRMS with vCenter and connect to the supplied database to run the initial configuration of vSphere Replication.
If VRMS has been successful communicating with vCenter and the database, it will return to the Configuration screen with a green message labeled Successfully saved the startup configuration. This may take a few minutes to return. Wait until a message is generated, whether it is the green success message or an error. If an error message is generated, re-examine both the database and vCenter information carefully and try again.
vSphere Replication (VR) uses replication technologies included in ESX Servers with the assistance of virtual appliances to replicate virtual machines between sites. VR is provided by vSphere Replication Servers (VR Servers or VRS). VR Servers are managed by the vSphere Replication Managment Server (VRMS). Both VRMS and VR Servers are virtual appliances. VRMS provides a way to manage VR Servers across multiple hosts. If you are using VR, you must establish at least one vSphere Replication Server and exactly one VRMS at the recovery site. To enable replication in both directions, you must deploy exactly one VRMS at each site and at least one VRS at each site. You may want to create multiple VR Servers at each site if multiple servers are required to meet your load balancing needs for replication of virtual machines. Each VRMS must be registered with a corresponding vCenter Server. For example, the primary site VRMS must be registered with the primary site vCenter Servers.
Both the VRMS and VRS appliances provide a virtual appliance management interface (VAMI). These interfaces can be used to configure the VRMS database, as well as network settings, public-key certificates, and passwords for the appliances. Before using VR, you need to configure the VR infrastructure including having managed IP defined in runtime settings at both sites and having a VRMS database installed. This video provides useful guidance to help ensure you complete the installation and configuration process correctly. When installing SRM, be certain to select the VR option. If you have installed SRM and want to add VR, you can add that option by running the installer again. So, here are the steps for configure-ring vSphere SRM Replication for a Single Virtual Machine.
1. On the vSphere Client Home page, click VMs and Templates.
2. Browse the inventory to find the single virtual machine to be replicated using VR. Right-click the virtual machine and click vSphere Replication.
3. In the Replication Settings page, configure general replication settings.
These settings include the disk file location to which the virtual machine is replicated on the recovery site, how often the virtual machine is replicated, and how the guest OS is quiesced. Use the Recovery Point Objective (RPO) slider or enter a value to configure the maximum amount of data that can be lost during the recovery. The available range is from 15 minutes to 24 hours. For example, a recovery point objective of one hour seeks to ensure that the virtual machine loses no more than one hour of data during the recovery. For smaller RPOs, less data is lost in a recovery, but more network bandwidth is consumed keeping the replica synchronized.
The available quiescing types are determined by the virtual machine's operating system. Microsoft Volume Shadow Copy Service (VSS) quiescing is supported for Windows virtual machines running Windows XP or later. Linux does not support quiescing. If no target file location is specified or if you want to override the default determined by the datastore mappings, click Browse to select a target location for the virtual machine.
vSphere 5.0 can be confgured to enable VMware ESXi host swapping to a solid-state disk (SSD). In the low host memory–available states (high memory usage), where guest ballooning, transparent page sharing (TPS) and memory compression have not been sufcient to reclaim the needed host memory, hypervisor swapping is used as the last resort to reclaim memory from the virtual machines. vSphere employs three methods to address limitations of hypervisor swapping to improve hypervisor swapping performance.
1. Randomly selecting the virtual machine physical pages to be swapped out. This helps mitigate the impact of VMware ESXi pathologically interacting with the guest operating system’s memory management heuristics. This has been enabled from early releases of VMware ESX.
2. Memory compression of the virtual machine pages that are targeted by VMware ESXi to be swapped out. This feature, introduced in vSphere 4.1, reduces the number of memory pages that must be swapped out to the disk, while reclaiming host memory efectively at the same time and thereby benefting application performance.
3. vSphere 5.0 now enables users to choose to confgure a swap cache on the SSD. VMware ESXi 5.0 will then use this swap cache to store the swapped-out pages instead of sending them to the regular and slower hypervisor swap fle on the disk. Upon the next access to a page in the swap cache, the page will be retrieved quickly from the cache and then removed from the swap cache to free up space. Because SSD read latencies are an order of magnitude faster than typical disk access latencies, this signifcantly reduces the swap-in latencies and greatly improves the application performance in high memory over commitment scenarios.
In this video I’ll show you how SDD storage is detected by the ESXi host after adding a new datastore. You will also learn how to configure VMware ESXi host swapping and redirecting virtual machine swap files to solid state storage.
VMware vCenter Server allows you to centrally manage hosts from either a physical or virtual Windows machine, and enables the use of advanced features such as vSphere Distributed Resource Scheduler (DRS), vSphere High Availability (HA), vSphere vMotion, vSphere Storage vMotion, and vSphere Auto Deploy. You can install vCenter Server in a Microsoft Windows virtual machine that runs on an ESXi host. Deploying the vCenter Server system in the virtual machine has the following advantages:
- You can provide high availability for the vCenter Server system by using vSphere HA. - You can migrate the VM containing vCenter from one host to another. - You can create snapshots of the vCenter Server virtual machine. - Rather than dedicating a separate server to the vCenter Server system, you can place it in a virtual machine running on the same host where your other virtual machines run.
This video will show you how to install VMware vCenter Server 5.0 in a virtual machine 13 simple steps.
Step 1 > In the software installer directory, double-click the autorun.exe file to start the installer.
Step 2 > Select vCenter Server.
Step 3 > Follow the prompts in the installation wizard to choose the installer language, agree to the end user patent and license agreements, enter your user name, organization name, and license key.If you omit the license key, vCenter Server will be in evaluation mode, which allows you to use the full feature set for a 60-day evaluation period.
Step 4 > Choose the type of database that you want to use.
Step 5 > Set the login information for vCenter Server.
Step 6 > Either accept the default destination folders or click Change to select another location.
Step 7 > Select Create a standalone VMware vCenter Server instance or Join Group.Join a Linked Mode group to enable the vSphere Client to view, search, and manage data across multiple vCenter Server systems. S
Step 8 > If you join a group, enter the fully qualified domain name and LDAP port number of any remote vCenter Server system.
Step 9 > Enter the port numbers that you want to use or accept the default port numbers.
Step 10 > Select the size of your vCenter Server inventory to allocate memory for several Java services that are used by vCenter Server. This setting determines the maximum JVM heap settings for VMware VirtualCenter Management Webservices (Tomcat), Inventory Service, and Profile-Driven Storage Service. You can adjust this setting after installation if the number of hosts in your environment changes. See the recommendations in the vCenter Server Hardware Requirements topic in System Requirements.
Step 11 > (Optional) In the Ready to Install the Program window, select Select to bump up the ephemeral port value. This option increases the number of available ephemeral ports. If your vCenter Server manages hosts on which you will power on more than 2000 virtual machines simultaneously, this option prevents the pool of available ephemeral ports from being exhausted.
Step 12 > Click Install. Installation might take several minutes. Multiple progress bars appear during the installation of the selected components.
A fellow VCI who was teaching the vSphere 5 What's New training course got a question from a student asking what happens to resource pools when vCenter goes down, because with vSphere 5.0 all the setting for resource pools are "moved" to vCenter.
Andy Cary who works as a Senior Technical Trainer at VMware responded immediately with: I created a RP on my vCenter and turned off expandable reservations for memory. Placed VM1 under said resource pool and failed to power up because the VM need to reserve memory for the overhead of running the VM (had no reservations set on the RP). So next I directly connected to the host and powered on the VM with no problem at all. However when you go back to the vCenter it displays:
The Cluster with the RP is now invalid because it can see the VM has powered on. So the configuration about DRS RP is saved on the vCenter but it doesn’t stop you going directly to the host an powering on the VM. Now in vSphere 5.0 if you directly connect to a host and try and create a local resource pool it will throw up an error saying this isn’t allowed because it can see you are managed by vCenter, this is the case even if the Host isn’t a member of DRS cluster. So the creation and management of RP is done via vCenter, if vCenter goes down the rules cannot be applied so you could get admin powering on VMs by directly connecting to the hosts. So in summary all we have done is said “You can only create, modify resource pools via vCenter and not by directly connecting to the host”
To meet ever growing IT infrastructure needs and to ensure business continuity in case of a site-level disaster, it is critical to have live mobility and fully automated, efficient disaster recovery (DR) processes for virtualized enterprise applications across data centers. Failure to have a robust and efficient mobility and fully automated disaster recovery solution can result in millions of dollars of lost revenue and employee productivity.
This white paper showcases a flexible solution from Cisco®, VMware®, and EMC® that allows customers to efficiently achieve live mobility and fully automated DR for virtualized enterprise applications across data centers with less than 10ms round-trip time (RTT) latency between them.
Live mobility for virtualized applications across data centers enables IT organizations to efficiently meet various operational needs, e.g., data capacity expansion, seamless migrations, disaster avoidance, etc.
Fully automated DR allows customers to protect their mission critical enterprise applications against site-level disasters and ensures business continuance. A key advantage of this solution over manual, runbook style DR process execution is "minimum downtime with lowest Recovery Time Objective (RTO)". This is extremely critical for next generation cloud solutions required to host hundreds to thousands of virtualized applications on the same shared infrastructure.
The Cisco, VMware, and EMC design presented in this white paper is very modular so that, based on customer requirements, there is flexibility to deploy both the live mobility and fully automated DR solution or deploy any one of these solutions.
Logging in vSphere 5.0 has been significantly enhanced. You now have fine-grained control over system logs, the location where logs are sent, and, for each log, default size and rotation policy. You can set up logging with the vSphere Client or with the esxcli system syslog command and the PowerCLI VMHostSysLogServer Commandlets. You can also set up logging behaviour for a host by using the Host Profiles interface in the vSphere Client and can then import that host profile into other hosts.
VMware vSphere ESXi 5.0 hosts run a syslog service (vmsyslogd) which provides a standard mechanism for logging messages from the VMkernel and other system components. By default in ESXi, these logs are placed on a local scratch volume or a ram disk. To preserve the logs further, ESXi can be configured to place these logs to an alternate storage location on disk, and to send the logs across the network to a syslog server.
You have to install the vSphere Syslog Collector to enable ESXi system logs to be directed to a server on the network, rather than to a local disk. It’s possible install the Syslog Collector on the same machine as the associated vCenter Server, or on a different machine that has network connection to the vCenter Server. The Syslog Collector service binds to an IPv4 address for communication with vCenter Server, and does not support IPv6. The vCenter Server can be on a host machine in an IPv4-only, IPv4/IPv6 mixed-mode, or IPv6-only network environment, but the machine that connects to the vCenter Server through the vSphere Client must have an IPv4 address for the Syslog Collector service to work.
In the ESXi Software panel there's an Advanced Setting called Syslog.global.LogHost, the value of this setting presents the remote host to which syslog messages are forwarded and port on which the remote host receives syslog messages. You can include the protocol and the port, for example, ssl://hostName1:514. UDP (default), TCP, and SSL are supported. The remote host must have syslog installed and correctly configured to receive the forwarded syslog messages. Checkout the video how the syslog service is installed on the vCenter host.
You can also set up ESXi Syslog from the Host Profiles Interface. Hosts provisioned with Auto Deploy usually do not have sufficient local storage to save system logs. You can specify a remote syslog server for those hosts by setting up a reference host, saving the host profile, and applying that host profile to other hosts as needed. Best practice is to set up the syslog server on the reference host with the vSphere Client or the esxcli system syslog command and save the host profile. In some situations, setting up syslog from the Host Profiles interface is an alternative.
The card is available under a Creative Commons license, so feel free to copy and distribute this in paper or electronic format. Just check back frequently to www.vReference.com for updates, or subscribe to the RSS feed to be the first to know.
Forbes Guthrie: At long last, the vSphere 5.0 vReference Card is ready. Go and grab it over here. This time I’ve split it up into both an A4 version and a separate Letter size one. This should hopefully make the printing experience more consistent regardless of which side of the pond you try.New with this release is a full page version. This is the same information as the card, but I’ve increased the font to a less eye-ball screamingly small font. This should make it make much more conducive to reading as a study guide, or if you want to bone-up on a particular area.
VMware supports in-place upgrades on 64-bit systems from vCenter Server 4.x to vCenter Server 5.0. You can upgrade VirtualCenter 2.5 Update 6 or later and vCenter Server 4.0.x to vCenter Server 5.0 by installing vCenter Server 5.0 on a new machine and migrating the existing database.
This upgrade method makes it possible to upgrade from a 32-bit system to a 64-bit system. Alternatively, if the VirtualCenter or vCenter Server database is on a remote machine, you can upgrade the database. vCenter Server 5.0 can manage ESX 3.5.x/ESXi 3.5.x hosts in the same cluster with ESX 4.x/ESXi 4.x hosts.
You cannot upgrade a vCenter Server 4.x instance that is running on Windows XP Professional x64 Edition to vCenter Server 5.0, because vCenter Server 5.0 does not support Windows XP Professional x64. This article provides information about upgrading to vCenter Server 5.0.
The host-X-hb (where X is the host’s MOID) is Located on each heartbeat datastore, this file is used to check for slave liveness through the heartbeat datastore. This file is checked by the master host if the master loses network heartbeats from the slave.
For VMFS datastores, the vSphere HA agent locks this file with an exclusive lock and relies on the VMkernel heartbeat to indicate liveness. For NFS datastores, vSphere HA periodically updates the time stamp to this file to indicate liveness.
The host-X-poweron (where X is the host’s MOID) is a per-host file that contains the list of all virtual machines that are powered on. This file is used as a communication channel if a management network outage occurs. Isolated slaves use this file to tell the master that it is isolated as well as to tell the master which virtual machines it has powered off.
The master host must determine whether the slave host:
• Actually crashed • Is not responding because of a network failure • The HA agent is in an unreachable state
The absence of both a network and datastore heartbeat indicates full host failure. Datastores are used as a backup communication channel to detect virtual machine and host heartbeats. Datastore heartbeats are used to make the distinction between a failed, an isolated or a partitioned host.
vCenter Chargeback Manager is an end-to-end cost reporting solution for virtual environments that are using VMware vSphere. vCenter Chargeback Manager provides functionality to define unit costs and calculate the overall costs based on the actual usage or reservation of computing resources. This Web-based application interacts with the vCenter Server Database to retrieve usage information, calculates the cost by using the defined chargeback formulas, and generates cost and usage reports.
vCenter Chargeback Manager runs on an Apache Tomcat server instance. Users interact with vCenter Chargeback Manager through a load balancer (Apache HTTP Server). vCenter Chargeback Manager connects to the vCenter Chargeback Manager database that stores application-specific information, such as the defined chargeback hierarchies, cost models, users, roles, and so on. The application interacts with the vCenter Server using VIM APIs and with the vCenter Server database through a data collector. The data collector communicates with the vCenter Server Database using JDBC.
vSphere supports several command‐line interfaces for managing your virtual infrastructure including the vSphere Command‐Line Interface (vCLI), a set of ESXi Shell commands, and PowerCLI. You can choose the CLI set best suited for your needs, and write scripts to automate your CLI tasks.
The vCLI command set includes vicfg- commands and ESXCLI commands. The ESXCLI commands included in the vCLI package are equivalent to the ESXCLI commands available on the ESXi Shell. The vicfg command set is similar to the deprecated esxcfg- command set in the ESXi Shell.
You can manage many aspects of an ESXi host with the ESXCLI command set. You can run ESXCLI commands as vCLI commands or run them in the ESXi Shell in troubleshooting situations. You can also run ESXCLI commands from the PowerCLI shell by using the Get-EsxCli cmdlet. See the vSphere PowerCLI Administration Guide and the vSphere PowerCLI Reference. The set of ESXCLI commands available on a host depends on the host configuration. The vSphere Command‐Line Interface Reference lists help information for all ESXCLI commands. Run esxcli --server <MyESXi> --help before you run a command on a host to verify that the command is defined on the host you are targeting. You can use this link to get your copy of the VMware ESXi 5.0 Reference PosterContinue reading "Video - Using the ESXI 5.0 vCLI Command Set " »